
Document Camera
Snapshot
Type of Interaction: Asynchronous
Type of Course: Hybrid, Flipped, Online
Tools Used: Zoom, TechSmith Relay, MediaFlo
For instructors who are accustomed to working with a traditional hand drawn method of lecturing using a white board, chalk board, or old-school overhead projector, but are trying to transition to teaching fully online, creating a mini lecture with a document camera allows for students to view and hear the lecture, view the instructor’s face, and view the hand drawn information all in the same video frame as seen in Figure 1 below. The steps below describe one way of creating a mini lecture featuring a document camera.
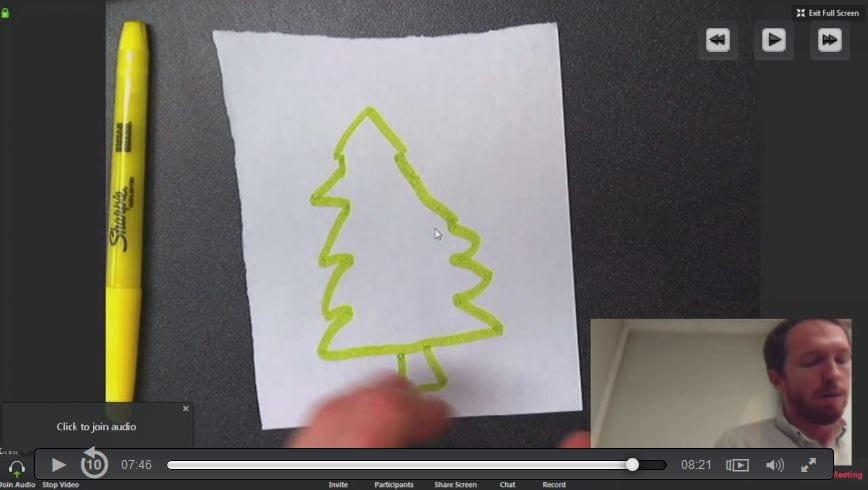
Figure 1
Note that we discourage faculty from posting full-length lecture recordings. Instead, consider recording a short video (5-10 minutes) or a series of short videos and focus the course design on keeping students engaged using active learning strategies, for example, applying what you have demonstrated in a practice exercise.
Materials Required:
- Windows laptop (not a Mac)
- A web camera if there is not one built into your laptop
- Document camera
- USB A to USB B cable (or whichever cables the doc cam in question requires)
- TechSmith Relay Account
- Zoom Account
For a video demonstration of the production method described above, please visit the link below: https://mediaflo.txstate.edu/Watch/d5MBx49K
The steps to creating a minilecture with a document camera are as follows.
- Create a Zoom Pro account.
- Create a TechSmith Relay Account.
- Identify a teaching classroom or lab with a document camera (Elmo, Panasonic, etc…).
- Connect the USB B end of the USB A to USB B cable you brought with you to the document camera temporarily unplugging the USB cable that is already connecting the document camera to the locked cabinet; Note: newer doc cams may have different cables – prepare accordingly. (Remember to plug this back in later.) Connect the USB A cable to your Windows laptop you brought with you.
- Launch Zoom. (Zoom displays the hand drawn portion of your video.)
- Launch TechSmith Relay.
- Position the document camera and webcam as you want it for the minilecture.
- Begin recording in TechSmith Relay. (Keep in mind that TechSmith is running in the background once the recording begins and is not visible while you work.)
- Make Zoom full screen.
- Perform your mini lecture.
- Exit full screen in Zoom.
- End the TechSmith recording. (TechSmith will automatically upload your video to your Mediaflo account.)
- Visit Mediaflo to the get the embed code for your newly created video.
Image source: https://commons.wikimedia.org/wiki/File:Joyusing_V500_HDMI_VGA_USB_Document_Camera.jpg
For Mac users … some doc cams have a slot for an SD card — insert card and find the “record” button. When finished, press stop. Eject the SD card, and import into a video editor to add titles, etc.
What a great tip! Thanks.